Bringing New Life To Board Games

Here’s a quick and easy idea to breathe some new life into the tired old board games your kids want to keep playing over and over. Use Lego minifigures as your game board pieces!


img_4773


After my kids trashed the paper cutout players for Chutes and Ladders, and have almost somehow lost all of the Candy Land players, I finally realized that I had a treasure trove of exciting new players at my disposal, Lego minifigures! Just grab your favorite characters or maybe you can create personalized figures of yourselves to play your games for you! My kids are obsessed with “The Nightmare Before Christmas” so we used our Jack and Sally minifigures this time. These are custom made by the fine folks at minifigs.me but any minifigs you have will do perfectly! Maybe Yoda and Darth Vader can duke it out in a game of Monopoly!

Have fun digging into your minifig collection and remember, board games are not dead. 🙂


j.


Guitar Retrospective #11: “HB Adventure Strat”

dsc01397

It’s been awhile since I posted a guitar retrospective. There are still quite a few to go to get caught up to present times, so here we go!

This guitar started life back in early 2008 as a guitar kit. I had been looking into other means of obtaining guitars to refinish and after doing several Squier strats (“Wild Horses”, “Koi Flower”, “Miartisme”) I wanted to try these kits I had been reading about. I had done an LP style guitar from a Saga kit before, but I had tracked down some strat and tele style electric guitar kits made by Grizzly, which was a big woodworking and metalworking machinery company that had a local store, so I was able to go and pick a few up to try out. It wasn’t a typical place you would think to find guitar kits. Turns out the owner of Grizzly was a luthier himself, who made some pretty amazing guitars, so he offered these kits and other guitar parts through his company. You can still get guitar parts there, but it appears the kits are no longer available. It was your standard electric guitar kit, decent body and neck, with a blank headstock (the stratocaster and telecaster style headstocks are copyrighted by Fender so couldn’t be reproduced and sold), and probably lower end hardware and electronics.

dsc00879

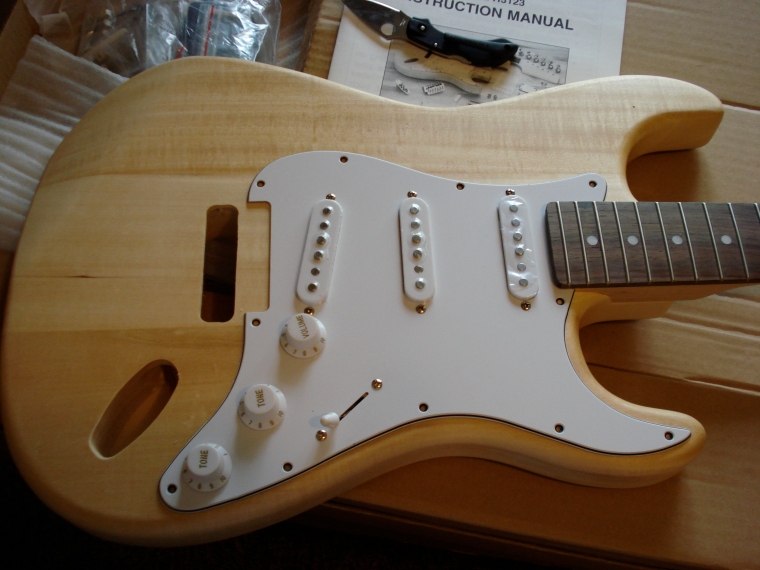
I remember the reason I wanted to try guitar kits was because you started with a complete guitar, and the body was a blank canvas, you didn’t have to do any work to strip it down before you could refinish it. But it was wise to do a rough assembly of the guitar to make sure everything fit together ok, so there wouldn’t be any fun surprises at the end.

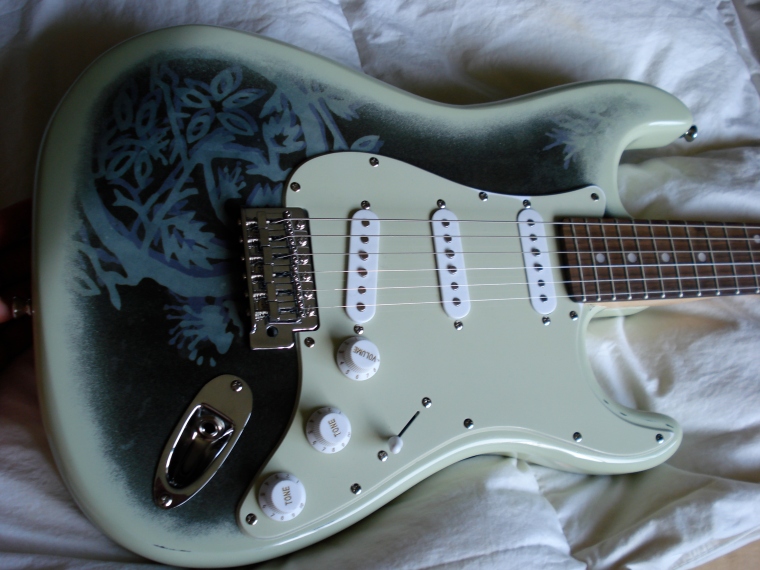
For the finish, I had this cool looking green fabric, I don’t even know how to describe it. If I were to free associate I would use words like; Celtic, hippie, natural, earthy, lavender, forest, green, free, peace, love, unity. I felt it was a great opportunity to use on one of these strats, and it really worked out for getting a good placement on the guitar to maximize the graphic element and still remain a cool subtle look. I started with the front and decided to finish the back with fabric also, with a more subdued section of the print, but it works to keep continuity. Here are some shots of the process. Pretty simple with this one, used the standard material finish process I’ve come to know: glued fabric on, sanding sealer, cut it out, more sanding sealer (a lot), sanding, paint, clear coats, final wet sanding and polish.

The Front:


The Back:


The Pickguard:

The kit came with a plain white pick guard, I didn’t feel this particular look required a matching pick guard, so I didn’t apply fabric to it, but I didn’t want to leave it stark white either. I  decided to paint it the same color as the edges and burst of the guitar, which was a seafoam green. I thought that color worked really well to compliment the graphic on the print as well as brighten it up overall, as the main color of the guitar was a dark green. Man I can’t believe I used to have time to think about stuff like that.


The Headstock:

As I said earlier, the kit came with a headstock blank, which looks like this.

dsc00874


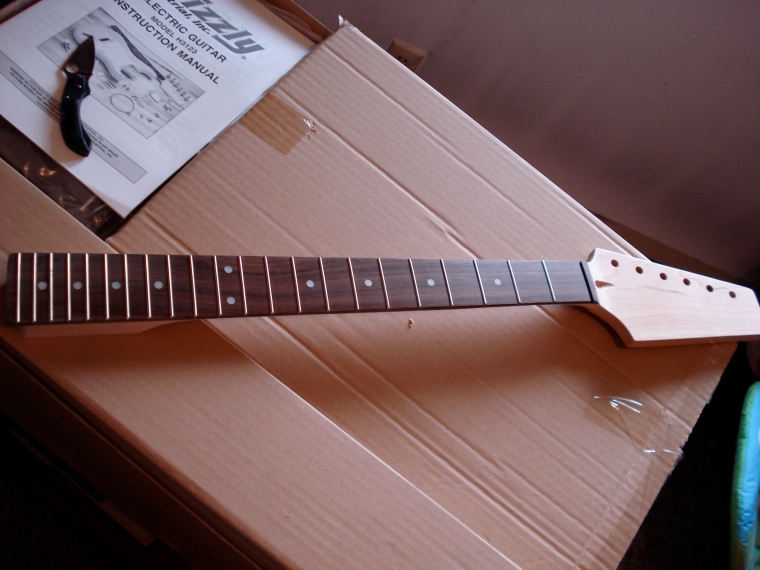
It’s just a paddle, which doesn’t look very good. I didn’t feel like dealing with this again myself, like I had with the Les Paul style guitar. So I talked to some people on the guitar forums I visited at the time, and found somebody that would cut them out for me in the traditional “strat” style. I sent them off, and they came back all nice and pretty, ready to go.

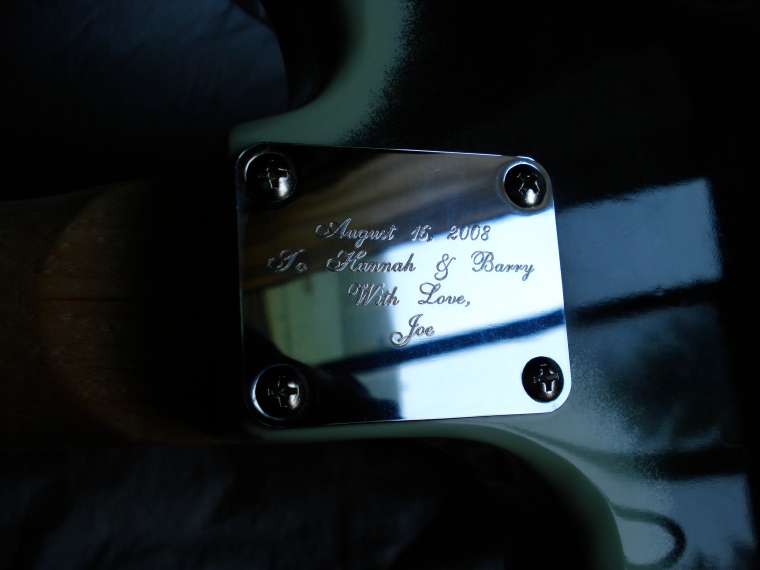
Also, during the process of refinishing this guitar, it became apparent who I was making it for. Some very close friends of mine were getting married, and try as I might, they just wouldn’t push their wedding date back so I could get this thing properly done in time to give it to them. (I know right!? So selfish.) I thought about my options, and realized I would just do as they do, and go with the flow, and use the opportunity to make it really personal, so I hand wrote the name on the headstock and added a personal note on the back. I don’t think I’ve had to admit this yet, but I did this on the day of their wedding  before leaving my house. I was working on this thing to the very last minute. It is by no means fancy, but I think it’s fitting, and it works, and that’s what I tell myself.


HB Adventure:

You’ve been wondering this whole time, “What the hell is HB Adventure”? I purposely waited until the end to tell you, because I worry about your attention span and wanted you to earn it. Let me be the first to say, Congratulations! Here it comes. HB stands for Hannah and Barry, two very dear friends who I knew separately and then came together to create a beautiful life, incredible love story for sure. <humor>You see Barry was my ex-boyfriend and Hannah was a chick I knew in High School, at least that’s how I remember it. </humor> They really lived life proper traveling and had a blog to tell us all about it while I stayed home making guitars and checking in on their adventures. Life is still happening over at HBAdventure.com, to the fullest to be sure. I really admire my friends who have always seemed to do life right, exploring and capturing the very best life has to offer, and leaving the rest. They teach that now to their two beautiful daughters.

But back in August of 2008, they were just getting married, and I had made a gift for them. I had taken the neck plate in to be engraved, as I was known to do for special occasions. (Mostly this is so they don’t forget who it came from, I hope they don’t know any other “Joe’s”.) 😉

dsc01399


j.


Homemade gifts. Wooden toy tools.

My wife and I have a love for wooden toys. They have such a timelessness and warmth to them, and will often last through generations. We have bought wooden toys and keepsakes for our kids in the past, but this Christmas, instead of making the usual Etsy purchases, I thought I would take a shot at making them myself. My son is almost 2, so I thought some toy tools would be fitting.
I headed to my brother’s place where he has a shop, so would be easier to do the work with all of the large tools handy. I had some basic tools that I traced out on some scrap pine boards that he had laying around.


Once I had them traced out I seperated each template and took them one by one to the bandsaw to get a rough cutout. After cutting each one out my brother would hit it with the drill press to make any necessary holes, we ended up putting a hole in the bottom of each tool (except the saw) for hanging.


The saw was a bit interesting because the handsaw I had to use as a template was quite larger for a little 2 year old hand, we had to shrink it down. My brother took a picture of the full size saw, took it into the computer and printed an image as big as would fit on a sheet of paper, so that became our new template.

New saw template, shrunk down.

To get the feel of the “blade” being separate from the handle, we shaved off a bit from each side with the bandsaw. Some more intricate dremel work and sanding was able to shape the rest of the handle.

The rest of the shaping was done with a belt sander, spindle sander, dremel sanding attachments, jigsaw to cut the inside of the saw handle, and random orbital sander. I also used a router to round over all the edges which really gave it a nice feel and professional look. Some sanding by hand with a finer grit paper finished them off. I have plans to seal and finish them with a Beeswax & Olive Oil concoction I found by researching online. But for now, they are raw and enjoying being manhandled by an almost 2 year old. 😊

They even compliment his little tool belt he got. 😊


It was a pleasure going through the process of making these toys, extremely satisfying experience. But the joy of watching my boy playing with and enjoying something I made by hand, is incomparable.


j.


Lego “Pictures With Santa” MOC

Merry Christmas! 

An opportunity came up recently to create a Lego vignette for a build competition held by Lego at their Rebrick site. The task was to create a room to add to one of Lego’s modular buildings. The Grand Emporium is the Lego shopping mall, and being Christmas time, malls across the country feature a pop-up Christmas display where parents and children line up to get their picture taken with Santa. It can be a happy and exciting time, or it can be a frustrating and miserable experience. Sometimes both at once! It has become a modern tradition to parade our children in front of Santa so they can happily tell him what they want for Christmas or they can ball their eyes out in a wild screaming fit. Either way, picture worthy and parents line up for hours to roll those dice to see what reaction they’ll get that year. I tried to capture all of the usual elements in one small scene. 

This vignette was more fun than usual because I enlisted my lovely wife to help me design it! She has a very good asthetic  eye for design and decorating so she was able to help with the layout and ideas for what to add and I was able to interpret those ideas into the model. A perfect team! Even got her doing some building, she created the holly decorations on the wall flanking the fireplace, which is an elegant touch and I love it. As someone who hasn’t been overly thrilled about my Lego hobby, it was a great experience to get her involved and share that time with her. We stayed up into the wee hours of the morning one night making this, and she said she had trouble sleeping because she kept thinking about ideas for things to change or add. Welcome to the club honey. 😉 

So this vignette is a typical festive scene, centered around Santa in an oversized comfy chair in front of a fireplace, which does light up in fact! I mounted a light brick on the back side of the wall to illuminate the fireplace with a warm glow. 


Includes the familiar Christmas fare like Christmas tree, North Pole sign, snowman, table with milk and cookie, and presents. One child in line has a happy expression and one is crying, very typical in this situation!


Also features a mother who brought her baby in for first pictures with Santa, and her and the photographer doing whatever it takes to get a smile out of baby, also very typical for this scene!

This was a lot of fun and I loved finally doing a Christmas scene in Lego, and having my wife help me was a joy and I think the result was far better than it would have been if I did it on my own, and it got done much quicker. Thanks for checking it out, I hope you enjoy and Merry Christmas! 

j.


The Lego Americana Roadshow

lego_roadshow_logo

There seems no better time than the night of the 2016 Presidential Election to showcase some incredible United States themed Lego builds. The Lego Americana Roadshow is a traveling exhibit of iconic buildings and architecture from around the United States created entirely out of Lego bricks.

I had the chance to visit a local area mall that was hosting the exhibit during the second half of October. On Saturday October 22nd I packed the family up and dragged them to the Alderwood Mall in Lynnwood, WA so I could stare at some Legos assembled in some incredible shapes.

img_3980

My adorable family being dragged along (prior to meltdowns).


Upon entering the mall and quickly scanning the area I found the first display and secured a map with all the necessary information. I’m going to go down the list and share my pictures of each one, but let me just say that these were all AMAZING! They were huge in scale, way bigger than I had anticipated, and intelligently spread throughout the mall to provide some space to gather around, and made it a bit of a scavenger hunt. The map also had a question for each model, so kids (and adults) could learn a thing or two, which they could find the answer to on a sign posted near the model which had information on both the original piece of architecture and the Lego model alike.

img_4109


This completed form could have been turned into the Lego store for a free poster of the event, but my typically adorable children reached meltdown status during the last couple of models so we rushed right on out of there to avoid being judged by strangers.


And here are the models. I don’t have a lot of commentary for these other than they are flat out impressive. Not just size which is obvious but detail, and sheer number of bricks when you are looking up close, for each one. Incredible. For most of these I had to stand quite a ways back in order to get the whole model in the frame, so that says something about the size of these. You can click on a picture to see a larger version and there’s an option to see full size image.


1. Statue of Liberty


2. Old North Church


3. Jefferson Memorial


4. The White House


5. Lincoln Memorial


6. The U.S. Supreme Court Building


7. Independence Hall


8. The Liberty Bell


9. U.S. Capitol Building


10. Washington Monument


Well I hope you enjoyed those images and could appreciate the scale of these models. As an added bonus, we went on the weekend where they had a “make-and-take” event. There was an area set up where people could line up and collect pieces to make a miniature Washington Monument to take home for free. My daughter and I each took a set home. Nothing beats free Lego. They had a different “make-and-take” model for each stop on the tour, you can find the instructions for each one here.


j.


Dia De Los Muertos en Lego

In honor of the Mexican holiday Dia de los muertos, or Day of the Dead, I recently put together this Lego minifigure. The head, or “sugar skull” as they call them, is a custom creation by the incredible minifigs.me crew. Beautiful! (They also made their own pair of fully custom Day of the Dead minifigures which are pretty sweet!)

I thought it would go perfectly with the Mariachi collectable  minifigure from the most recent series 16. I think I was right. So cool! 

j.


Lego “Radius Church” Vignette MOC


This was a very special build for me. Vignettes are my favorite type of build to make. I love little scenes, snapshots. I’ve had this nagging idea to make my own Lego sets, specifically for people that are special to me, and give them as gifts. My family has been part of a new church, Radius Church, and a week before launch date, my pastor said something that struck a chord in me. He emphasized the need to pursue the things God puts on your heart. In that moment I knew I needed to commemorate this special time for the church and for my pastor. I set to work on creating the stage at Radius and designing the custom elements that would make this build truly unique. 

One tricky part to this build was from the initial idea to completion the decoration on the stage changed. It started out pretty simple (table, stool, microphone, speakers) and then they added furniture to the stage (couch, rug, coffee table, etc.) so I had to add in some little furniture builds to keep it relevant, which I was thankful for because it really fills out the build and gives it some more color. The back wall features a large poster in the center (which is ever changing) flanked by two television screens which has bullet points and scripture throughout the sermon. One of Pastor Hubbard’s well known sayings and probably my favorite is “Where you’re at is not where you have to stay.” So I had that printed on tiles for the screens. I had the church logo printed on a black tile to make the center poster, which is how it was on launch day. The accessories included (coffee mug, tablet/phone, Bible) are typical staples on the pastor’s table. 

Special thanks to the team at minifigs.me for perfectly executing my requests and direction in their design and printing of all the custom pieces, which not only included the tile pieces but the head and torso pieces to create a minifigure version of Pastor Ken Hubbard. 

Reference image sent in for minifigure head design.

They created a head piece with his signature white goatee and a double sided head, one with glasses and one without, as Pastor Hubbard is always switching back and forth as needed. They also printed a torso with his cross necklace. 

And as a bonus, there is a second option for Pastor Hubbard. Outside of church he enjoys riding his motorcycle so there’s a more casual attire with biker jacket and beanie. 

Pastor Hubbard has been known to move about the stage so here he is enjoying the various vantage points.

I hope you enjoyed checking out my latest creation. It was an absolute joy to create.  As stated before, it is very special to me, as is my church. And I’m so thankful for an amazing pastor. 

j.


Lego “Mad Scientist Lab” MOC

Another year, and another build competition held by Radleys, a manufacturer of scientific glassware and laboratory instruments in the UK. If you remember last year, I submitted a recreation of Nikola Tesla’s famous laboratory. This year, I thought doing something more “fun” with some moving parts might fare better. It was a good challenge for me and definitely increased my building skills figuring out how to pull off this idea.

img_3433

The concept was to have a lab where the mad scientist was experimenting with fusing minifigures and objects/animals together to make unique creations. Lego has an ongoing line of Collectable Minifigures and they often have some interesting “suits” for the minifigs, depicting them as animals (penguin, chicken, etc.) or food items (hot dog, banana, etc.). I wanted to play with the idea of how these creations may have come to be. So I have one conveyor belt pushing minifigures into a hopper on one side, and on the other side a conveyor belt bringing in various animals and food items. The fusion is meant to take place inside the hopper and a tube which connects to a caged lift, revealing the abomination. Each manually operated conveyor belt has a control station manned by one of three lab assistants (I used Ugnaughts from the Star Wars line). I thought it would be fun to keep them all the same, sort of like Oompa Loompas in Willy Wonka. And of course you have the Mad Scientist’s operating platform looking out over the lab, with some appropriate decor in the corners and on the walls.


img_3473


Here is a video I did showing off all the moving parts and running through how the lab works.


And here’s a bunch of pictures showing the different areas of the build in detail. (All pictures can be clicked on to enlarge.)

img_3429

The lineup of creations.

img_3430

The lineup of unfortunate minifigures, all looking a bit anxious.


This green station is what I would call the Chemical Control Station.


The red station controls the minifigure conveyor belt. The minifigures slide into position in turn, and another mechanism pushes them into the hopper.


The main conveyor belt station, which drops in the animals/objects. This is powered by a knob that sits outside of the wall nearby for easy operation.


This is the lift cage that reveals the minifig creation.


And of course the mad scientist’s platform overseeing his experiment.


And some other various angles.


Here is the lineup of minifigure creations and what creates them. I did try to match them up somewhat so it would make some sort of sense. *shrug*


Thanks for taking the time to check out my latest Lego creation, I hope you found some enjoyment in it. Unfortunately, as good as I thought I did with this idea and build, it didn’t win or even get a special mention. (Results.) But that’s ok, I had fun coming up with idea and bringing it to life. Like I said before coming up with all the moving components was a new challenge that was really satisfying. And my nephews LOVED it, so I consider that a win. 😉

j.


Guitar Retrospective #10: “7-String Koi”


DSC00921
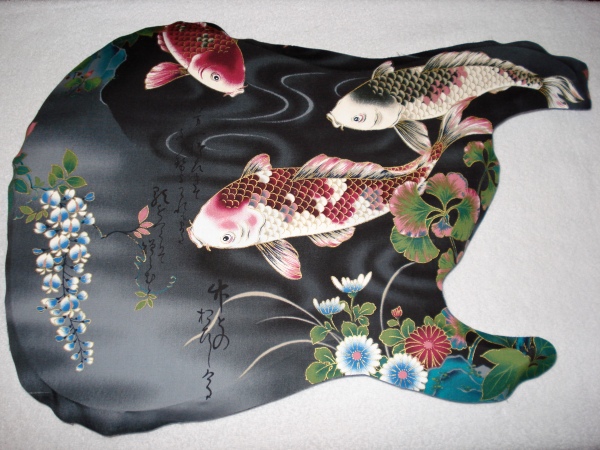
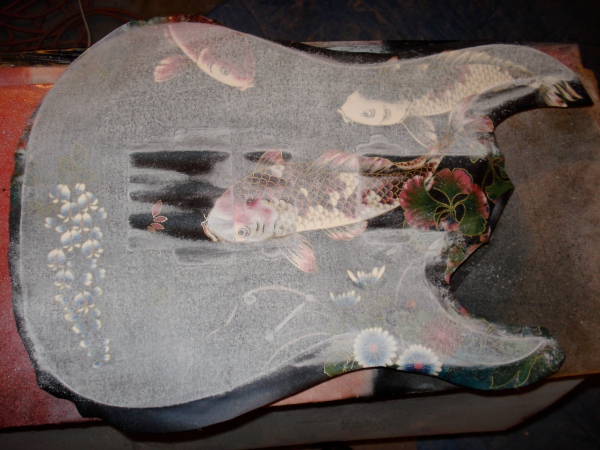
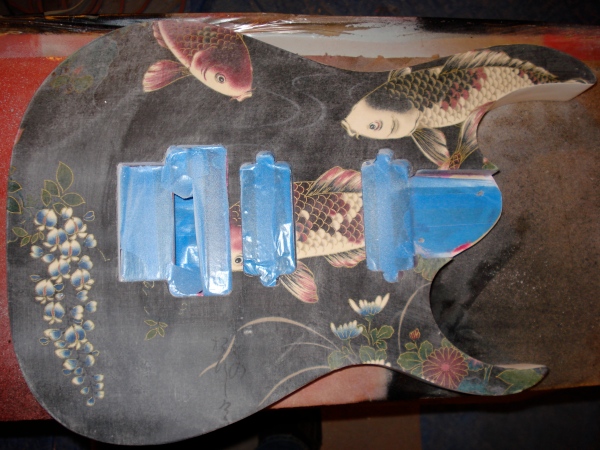
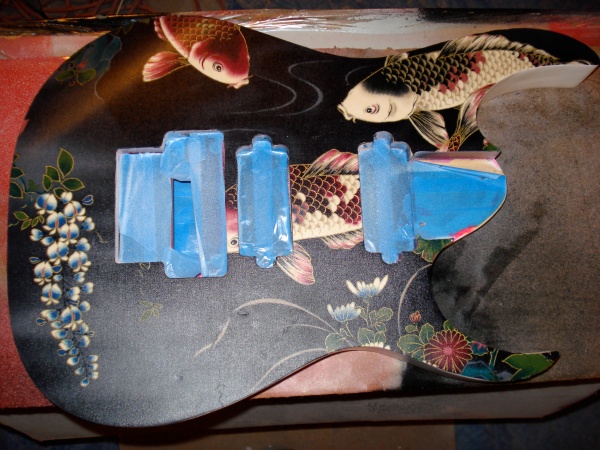
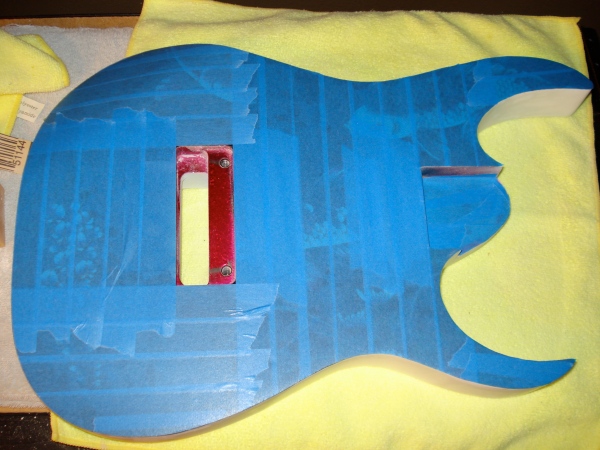
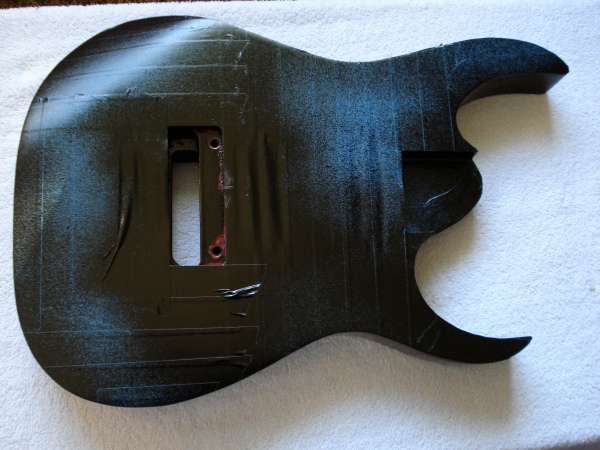
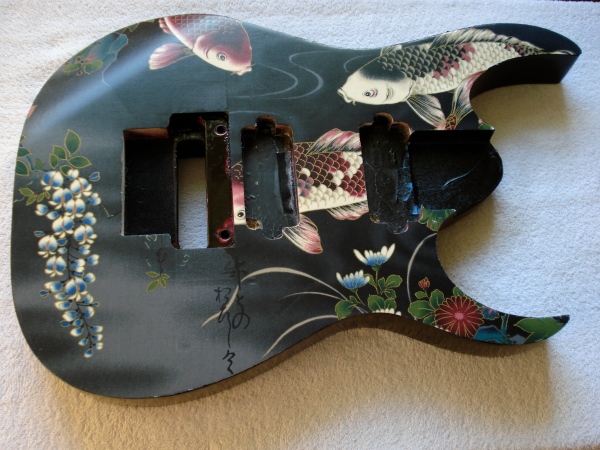
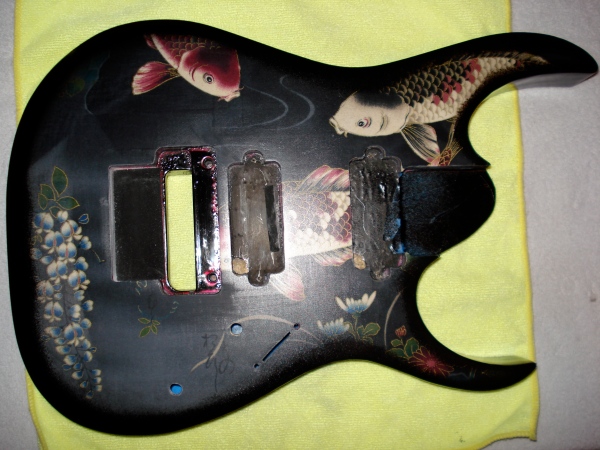
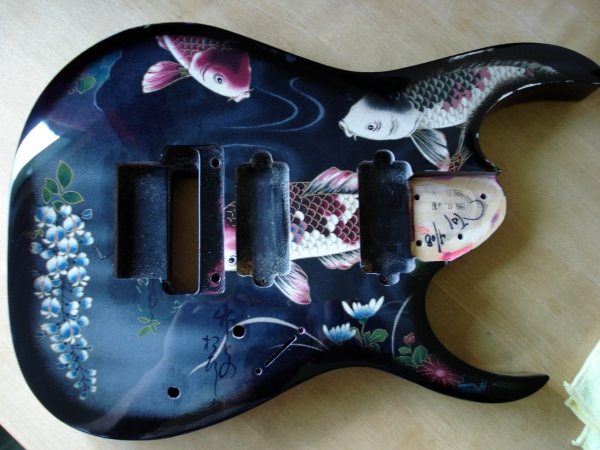
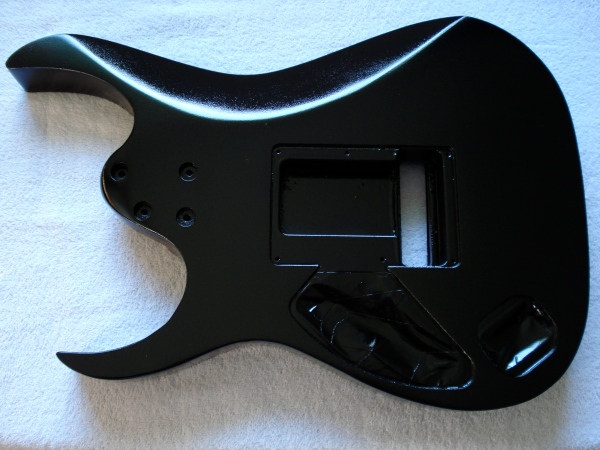
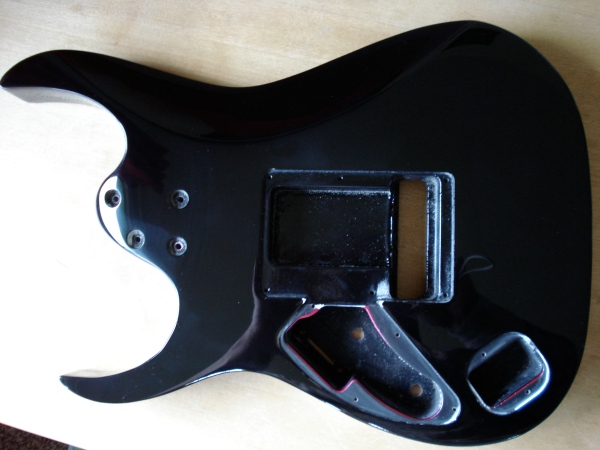
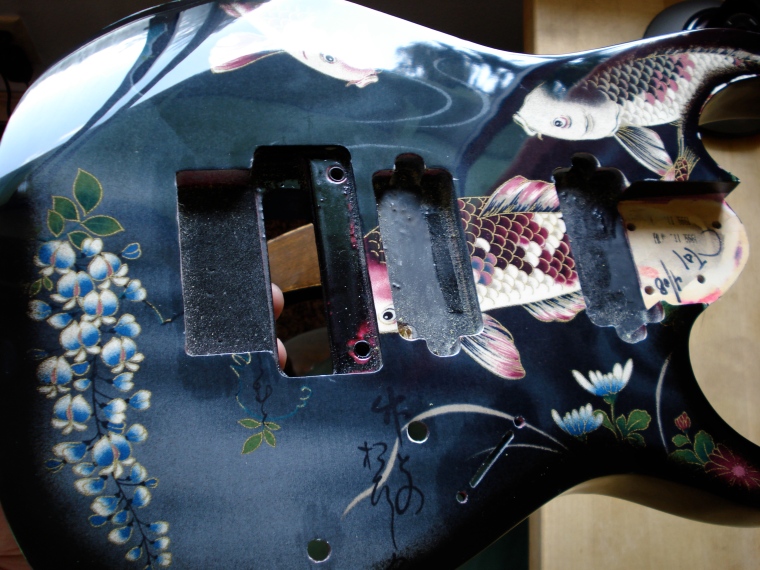
Beginning 2008 I picked up a guitar body on eBay for cheap thinking I would refinish it and resell it. It was a bit of an experiment to see how quickly I could turn around a guitar body and how much I could resell it for. I found an Ibanez RG 7 string body and stripped it down from its metallic burgundy finish to bare wood. I had another Koi fish fabric print on hand I wanted to use and this was a perfect opportunity. The fabric was dark so obviously suggested a black paint accompaniment. Also, since I was trying to do this quickly, I ended up just doing fabric on the front, and painting the back. It was pretty straight forward and took just a few months of working on it nights and weekends. I wish I could remember what I sold it for, but I don’t remember making a bunch of money on it, otherwise I would have done it a lot more. I went back to doing full guitars after this, so that’s a pretty good sign I hope I broke even on it. 🙂
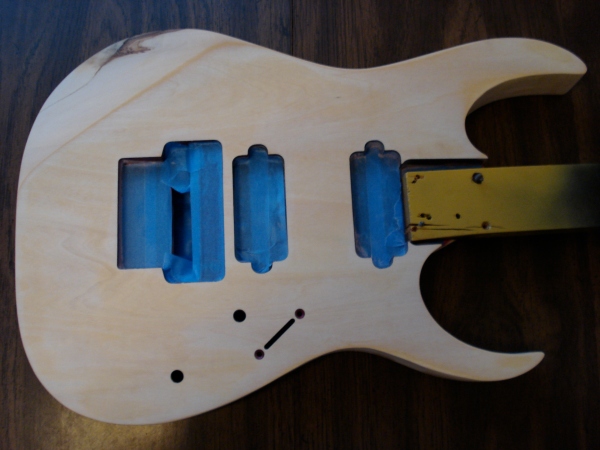
Here’s a gallery of progress shots on this project.

FRONT:

DSC00804DSC00806DSC00807DSC00810DSC00812DSC00816DSC00821DSC00822DSC00825DSC00919


BACK:

DSC00805DSC00817DSC00820DSC00922

GLAMOUR SHOTS:

j.


Lego “Trail of Tears” MOC

IMG_2419(Joe Wilbur Trail of Tears 2)

“The Trail of Tears”

My latest Lego creation is a depiction of the tragically famous “Trail of Tears”. During this stretch of time from 1830-1850, Native Americans were forced to leave their homelands in Southeastern United States to lands further west that were designated to them. The journey was devastating, to say the least. It’s pretty dark subject matter for Lego, but it’s something I’ve had the idea of doing for awhile, and the opportunity came up through a competition to finally build it.

While visiting Brickset one day, I discovered a new competition posted. Kockice, a Croatian LUG (Lego User Group), hosted an online build competition where users could build in 1 of 4 categories: 1-Greatest Inventions, 2-Ancient Civilizations, 3-The History of Art, or 4-One Moment in Time. It also had to be built on a standard 32×32 stud baseplate, or larger area. I couldn’t fit enough of what I wanted onto a baseplate of that size, so I went with a 48×48 stud baseplate.

My idea was to illustrate the pain and sadness of this event by having the native people walking away from the luscious green and bountiful landscape of home towards a barren, dark, scary and unknown land. It’s a simple idea, I just tried to use enough detail in the landscape to make it come across.

Sadly, I did not make the finalists, there was some incredible competition. BUT it was very satisfying creating this as it checked another box on the “things to create” list, which is always a win. 😉

To see the full album of submissions, click this link. Brickstory competition submission gallery. I was only able to upload 3 pictures, so here is a larger gallery of pictures showcasing my build. I need to improve my photography skills, or perhaps take the time to edit the photos some. :-/ I hope you enjoy. You can click on the images to start a slideshow of enlarged images.

j.